Adding and editing content in WordPress can be done completely online. Note: for edits and updates added on Forge, it takes 5 minutes for the changes to appear in production.
The Web editing toolbar explained
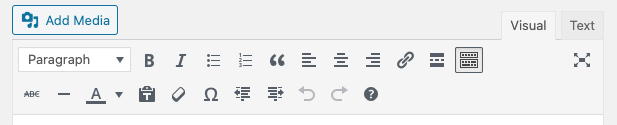
The Web editing toolbar allows you to easily format your content, e.g., displaying items in a list. The toolbar displays one row of buttons by default, which are considered to be more frequently used buttons, but the toolbar can also display a second row with more, lesser-used functions. To expand the toolbar click the Show/Hide Kitchen Sink button  .
.

One row toolbar
Two row toolbar
Most of the options in the toolbar are found in most word processors so the buttons should have a familiar look to them. However, the following buttons may need a little more explanation.
 Add media – Insert an image or link to a video, audio file, or other types of media files (e.g. pdf).
 Kitchen sink – Use this to expand or collapse the second row of the Web editing toolbar.
 Blockquote – Indent an entire paragraph. An example use would be when you want to highlight a quotation that is longer than a sentence.
 Toggle fullscreen mode – Expands your editing window to the full size of your browser window.
 Paste as text – If you absolutely must copy and paste from Word, click this button first. Text pasted normally from Word includes formatting that doesn’t translate well to the Web. Using this button will remove that formatting.
 Insert custom character – Insert a custom character like a copyright symbol.
Adding pages and setting page visibility
A WordPress page is just another name for a webpage.
- Hover your cursor over the Pages section of the Dashboard to expand the available options.
- Click Add New.
- Add your content
- To designate a page as private, click the Edit link beside Public located in the “Publish” box. Setting a page to “Private” will only allow those with at least the role of Subscriber to view the page. You may also set a password for a page and distribute it to those needing access.
- Click the [Preview] button, the [Publish] button, or the [Save Draft] button.
Adding posts and setting post visibility
A WordPress post can also be called a blog entry. These entries will be added to and display in your site’s blog in reverse chronological order.
- Click Add New under the Posts section title.
- Add your content.
- To designate a post as private, click the Edit link beside Public located in the “Publish” box. Setting a post to “Private” will only allow those with at least the role of Subscriber to view the post. You may also set a password for a post and distribute it to those needing access.
- Click the [Preview] button, the [Publish] button, or the [Save Draft] button.
Scheduling a post
You may schedule a post to automatically appear on a specific future date.
- Click Add New under the Posts section title.
- Add your content.
- Click the Edit link to the right of “Publish immediately” located in the “Publish” box.
- Change the date and time to your liking and click [OK].
- Click the [Schedule] button to publish the post on the scheduled date.
The Post Expirator plugin can be used to set posts to expire to draft form after a certain period of time on Forge sites. This can be useful for content that is only relevant for a short period of time.
Adding categories and tags to a post
Categories and tags are ways of organizing posts (a.k.a. blog entries) on your site. Assigning posts to these taxonomy terms will allow you and your site visitors to more easily find specific posts if you’re displaying the “Categories” widget or the “Tag Cloud” widget (Sites) or using a News Feed callout (Forge). Categories also allow you to add a menu item that creates a page aggregating all the posts from a particular category.
Adding Categories:
- Open the post you want to categorize.
- In the “Categories” block located on the right, place a check next to each category you wish you to assign to the post. You can also create new category names by clicking the + Add New Category link.
Adding Tags:
- Open the post that you want to tag.
- In the “Tags” block located on the right, enter the name of the tag you want you to use. Click the [Add] button. Or, select already created tags by clicking the Choose from the most popular tags link and clicking on the tags you want to use from the tag cloud.
Creating links in pages or posts
You can create links to external sites, internal documents, and your site’s pages and posts.
Inserting external links
- Highlight the text you wish to make clickable.
- Click the [Insert/edit link] button
 .
.
- Enter the full URL into the “Link URL” field. It’s recommended that you copy and paste the URL as opposed to enter it manually.
- External links should open in a new tab to be accessible. Click the gear button to see more options and check the “Open link in new tab” option.
Linking to internal pages or posts
Sometimes it is convenient to link back to one of your previously made pages or posts. The internal linking feature makes such references easy to set up.
- In the appropriate page or post, highlight the text you wish to make clickable.
- Click the [Insert/edit link] button .
- Click the gear button to see more options.
- Search for the appropriate page or post in the search bar or select one from the list of recent items.
- Click the [Add Link] button.
Uploading and linking to documents
Sometimes you may want to link to a document like an Excel or PDF file. These documents will be available to anyone on the Web so be sure they don’t contain any sensitive data.
- Click the [Add Media] button.
- Click the Upload Files link if the document is not part of your existing Media Library.
- Select the file from your computer to upload then click the [Save] button.
- Click the title of the file to locate, highlight, and copy the URL of the file.
- After copying the file’s URL, open the page or post in which you want to post a link to the document.
- Highlight the text you wish to make clickable.
- Click the [Insert/edit link] button .
- Paste the document’s URL into the “Link URL” field.
Inserting images into pages or posts
You can insert images into your posts or pages. You can use images already uploaded to your Media Library, images from your computer, or ones from another Web site.
Adding images from your computer
- Place your cursor where you would like the image to appear.
- Click the [Add Media] button located just above the main toolbar.
- Select the [Upload Files] tab.
- Click the [Select Files] button and locate the image.
- Click the [Save] button.
- A preview of the image will appear, which is where you edit settings for the image. Alternative text should be added for those with accessibility needs or the image should be marked “decorative”.
- Click the [Insert into Post] button.
Adding images from another Web site
For this to work, you need to know the URL of the image you want to use.
- Place your cursor where you would like the image to appear.
- Click the [Add Media] button located just above the main toolbar.
- Select the [Insert from URL] tab on the left hand side.
- Enter the Image URL and Image Title and edit any of the other settings.
- Click the [Insert into Post] button.
Adding images from the Media Library
- Place your cursor where you would like the image to appear.
- Click the [Add Media] button located just above the main toolbar.
- Select the [Media Library] tab.
- You will be presented with a list of images in the Media Library.
- Edit any of the image properties if you like.
- Click the [Insert into Post] button.
Editing images in the Media Library
WordPress 2.9 and higher provides some inline photo editing features such as rotating, resizing, and cropping.
Rotating or flipping an image
- In the Media Library, click the title of the image you wish to edit.
- Click the [Edit image] button.
- Click the rotate or flip button you wish to use.
- Click [Save].
Cropping an image
- In the Media Library, click the title of the image you wish to edit.
- Click the [Edit image] button.
- Enter into the Aspect ratio boxes a desired width and height proportion (e.g., 4:3, 16:9, or 1:1). Don’t confuse these numbers with the actual pixel dimensions of the image.
- Hold down the Shift key and drag a box around the section of the image you wish to keep.
- Adjust the selection box by dragging any of the corner boxes, again by continuing to hold down Shift.
- Click the [Crop] button
 .
.
- Click [Save].
Scaling/resizing an image
- In the Media Library, click the title of the image you wish to edit.
- Click the [Edit image] button.
- Click the Scale Image link.
- Enter the width or height (in pixels) you wish to scale your image. The other number will automatically change to match the proportion of the image.
- Click the [Scale] button.
Embedding videos from YouTube, Hulu, or Flickr
WordPress natively supports the embedding of media from a number of third party sites that support the oEmbed standard. The complete list of supported sites is available from WordPress.org.
- Place your cursor on its own line in the page or post in which you want to display the media.
- Copy and paste the URL of the video you wish you use. Remember, the URL must be from a site that is on the approved list of sites(e.g., YouTube, Hulu, or Flickr).
- This works only if “Auto-embeds” is enabled, which it should be by default. Go to the Dashboard Settings then Media and check “Auto-embeds”
Embedding Kaltura videos from media.lafayette.edu
Media uploaded and published publicly to a category at media.lafayette.edu can be embedded into a WordPress page or post. Note: the video must be published either as “Unlisted” or in a category.
- Copy the oEmbed URL from the media source at media.lafayette.edu.
- From the media source at media.lafayette.edu click the [Share] tab located under the player.
- Click the [oEmbed] button.
- Copy the “Embed Code,” which will appear as a URL.
- Place your cursor on its own line in the page or post in which you want to display the media.
- Paste the embed code.
Editing a page or post
- Click either the Pages or Posts section title in the Site Admin Dashboard.
- All of your pages or posts will be listed and any Drafts will be indicated with a “-draft” status to the right of the title.
- Click the title of the page or post that you want to edit.
- Click the [Preview] button, the [Publish] button, or the [Save Draft] button.
Deleting a page or post
- Click the Pages or Posts section title in the Site Admin Dashboard.
- Hover over the page or post title you wish to delete to reveal the quick links.
- Click the Trash link. This will place your deleted page or post in a holding area until you’re ready to purge the trash permanently.
- To permanently delete a page or post, click the Pages or Posts section title again to display all of your pages or posts.
- Near the top, click the Trash link located along side the All, Published, and Drafts links.
- Hover over the page or post title you wish to permanently delete to reveal the quick links.
- Click the Delete Permanently link.
Restoring a deleted page or post
- Click the Pages or Posts section title in the Site Admin.
- Near the top, click the Trash link located along side the All, Published, and Drafts links.
- Hover over the page or post title you wish to restore to reveal the quick links.
- Click the Restore link.
Managing page order, hierarchy, and menu structure
You can specify a hierarchical order for your pages, making some pages upper or “parent” pages and others sub-pages or “children.” This can be helpful in how your automatic menus are created.
Establishing page order
- Open the page that you want to order.
- Under the “Page Attributes” section located on the right side place an order number (e.g., 1, 2, 3, etc.) to indicate the page’s order.
- Click either the [Publish] button or the [Save Draft] button.
Establishing page hierarchy
To use the hierarchy feature your site must contain at least two pages.
- Open the page that you want to place into a hierarchy.
- Under the Page Attributes section located on the right side select the page from the drop-down menu that will serve as the “parent’ page. If you are going to place more than one page into a “parent” page then you may want to place an order number (1, 2, 3, etc.) to indicate the order of the “child” page.
- Click either the [Publish] button or the [Save Draft] button.
Redirecting a page to another page
This is a helpful function when you want to create a page that displays in the menu, but redirects to an external site or to another page on your own site.
- Enable the “Page Links To” plugin.
- Create the page you wish to display in your menu.
- Scroll to the bottom of the page and enter into the “Point to this URL” field the full URL (you must include the http://) of the site to which you want to link.
- Click either the [Publish] button or the [Save Draft] button.