Creating a Channel in MediaSpace
- Navigate to your MediaSpace by logging in to media.lafayette.edu.
- Select “My Channels” from the user drop-down menu.
- Click the [+Create Channel] button on the My Channels page.
- Fill in the appropriate information for your channel including setting the privacy setting and selecting options such as enabling subscription.
- Note: The “Description” field will appear in the header information of a channel.
- Click [Save]
Customizing Header Information and Thumbnail Image
Adding a Thumbnail Image to a Channel
- Navigate to your MediaSpace by logging in to media.lafayette.edu.
- Select “My Channels” from the user drop-down menu.
- Select the channel you wish to add a thumbnail image to.
- From the Channel Actions menu, choose “Upload Thumbnail”
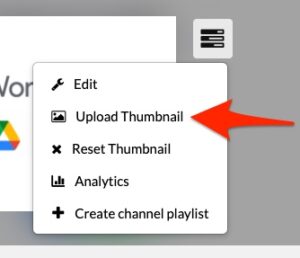
- A pop-up window will appear. Click [+ Choose a file to upload].
- Choose a file on your device and then click [Save].
Customizing Header Information
- Navigate to your MediaSpace by logging in to media.lafayette.edu.
- Select “My Channels” from the user drop-down menu.
- Select the channel you wish to edit.
- From the Channel Actions menu, choose “Edit”.
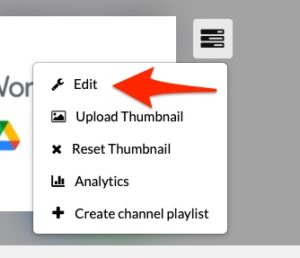
- Under the “Details” tab, fill in the “Description” field. This information will show in the header of a channel.
- Click [Save].
Adding Users to a Channel
Adding users to a channel allows others to be able to contribute and/or manage content in your channel.
- Navigate to your MediaSpace by logging in to media.lafayette.edu.
- Select “My Channels” from the user drop-down menu.
- Click on the edit (pencil) icon in the bottom right corner of the channel you wish to edit.
- Select the “Users” tab and then select the [+Add Users] button.
- A new pop-up screen will appear. Type the NetID or name of the person you want to add.
- Select the preferred channel role for that user or group and click [Add].
- Member – This permission allows the user to view the channel content
- Contributor – This permission level allows the user to not only view the channel content but also add media to the channel.
- Moderator – This permission level allows a user to view the channel content, add media to the channel, and moderate channel content.
- Manager -This permission level allows a user to view the channel content, add media to the channel, moderate channel content, and access channel settings.
Adding Media to a Channel
- Navigate to your MediaSpace by logging in to media.lafayette.edu.
- Select “My Channels” from the user drop-down menu.
- Select the channel you wish to add media to.
- Click the [+Add to Channel] button.
- Choose from two options:
- Select from existing media in Kaltura MyMedia.
- Select the checkboxes to the left of the media you wish to upload. Click [Publish].
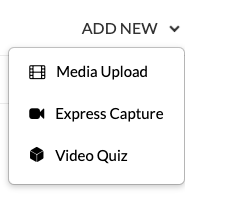
- Upload new media by choosing one of the options from the “Add New” drop-down menu located in the upper right corner.
- When finished, click [Publish].
- Select from existing media in Kaltura MyMedia.
Adding Media to a Gallery
Gallery’s contain Channels to organize content on media.lafayette.edu. You can publish media to a Gallery by following the directions below. Media will then appear within the Gallery’s “Media” tab.
- Navigate to your media by logging in to media.lafayette.edu.
- Select “My Media” from the user drop-down menu.
- Click the edit (pencil) icon to the right of the media you wish to edit.
- Click on the “Publish” tab.
- Choose “Published” from the “Publishing Status” options.
- Under the default “Publish in Category” tab, select the Gallery you wish to publish your media.
- Click [Save].
Enabling Subscriptions to a Channel
You can enable subscriptions to your channel by selecting the option “Enable subscription to a channel” from the “Options” section of you channel page.
When the Enable subscription option to a channel is checked, users can:
- Subscribe to the channel from the channel page
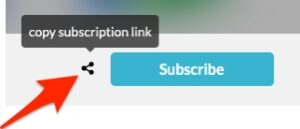
- Copy the subscription link (as shown in the following image) and distribute it to others who will automatically be subscribed to the channel once they click on the link.
Creating Custom Playlists within a Channel
Creating Custom Playlists within a Channel
You can create a playlist to organize or highlight specific media in your channel.
- Navigate to your MediaSpace by logging in to media.lafayette.edu.
- Select “My Channels” from the user drop-down menu and select the channel you wish to edit.
- In the upper right, click the Channel Actions menu and select “+Create Channel Playlist“.
- Enter the appropriate information for your playlist. Click [Create].
- Locate the drop-down menu located in the upper left under “Add Items to your playlist”. Choose to add existing content from My Media or Channel to your playlist.
- Select the [+] button to the right of each media you wish to add to your playlist.
- After you have added media, a checkmark appears next to the item, and the media also appears in the media listing to the right.
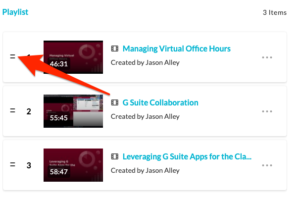
- You can change the order in which your media appears in your playlist by selecting the “=” sign (left of media) and manually moving the media in the appropriate order.
- When done, select [Go to Channel]. This will take you back to your channel page. Scroll to the bottom of the page and select [Save].
Display Playlists on the Channel Landing Page Verses Media
By default, a channel displays a list of all channel media on the main channel page. Channel managers may choose to display playlists on their channel landing page instead by following these instructions:
- Navigate to your MediaSpace by logging in to media.lafayette.edu.
- Select “My Channels” from the user drop-down menu.
- Select the channel you wish to edit.
- From the Channel Actions menu, choose “Edit”.
- Select the “Theme” tab.
- Select the “Playlists” option for “First tab”. This will display playlists on your channel landing page instead of media.
- Please note: A playlist must be created within a channel in order to see the “Playlists” option listed.
- Click [Submit]
Request a Public Channel on Media
If you would like to create a public channel on media.lafayette.edu, send a message to Help Desk at help@lafayette.edu.