Additional Help
- Additional Help Documentation on using Gravity Forms can be found on the Gravity Forms website.
- If you would like to view a demo form, one can found here: https://help.lafayette.edu/gravity-forms-sample
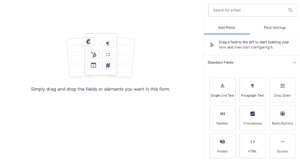
Standard Fields include options like Single Line or Paragraph Text and Drop Down questions. These fields are straightforward and are added to the form by simply dragging and dropping them into the form in the order you desire. Once added, clicking the field will toggle to settings/field settings, where additional edits can be made. A Field Label can be given, as well as a description or rules requiring the question be answered. There are also options to alter the appearance of the field and advanced options such as conditional logic. Anywhere that you see a ?, you can hover over it for more information.

Advanced Fields are for specific uses. They enable advanced formatting of regularly used fields such as Name, Email, Address, Date, etc.
The Date field adds a ‘date-picker’ question that by default starts the week on Monday instead of Sunday. As this may be confusing, you can change it to Sunday using the following steps:
Post Fields allow you to add fields to your form that create Post Drafts in WordPress from the submitted data. Additional information about how to use Post Fields to populate content on your site can be found on the Collecting Post Submissions with Gravity Forms help page.
Pricing fields allow you to add fields to your form that calculate pricing for selling goods and services. Note that these fields do not add any e-commerce component to your form/site; they allow for the selection of items and the tallying of goods.
Access Form Settings by clicking Forms on the left menu and Forms in the submenu. This will bring you to a list of all your forms. Hover over the form you would like to update and select Settings > Form Settings. Form Settings allow you to set things like Form Layout and the look and feel of the Form Button as well as options restricting access to the survey. The “Require user to be logged in” option requires users to first log in before accessing the form. There is also an “Anti-spam honeypot” option to help protect your form from spam.
The Confirmations section allows you to set up a confirmation email to be sent back to the form taker, and the Notifications section allows for notifications to be sent to the administrator of the site and/or others whenever a form is completed.
Note: The “From Email” and “Reply To” fields in any notifications should be set to an email of your choice, not left on the default setting of {admin_email}. The “From Email” is the displayed sender of the email, and the “Reply To” is who will receive any replies generated from recipients of the notification.
A log of all the entries created by respondents can be managed from the Entries tab. This serves as a log of all data collected with the form, as well as a way to see responses.
The Preview tab opens a preview of what the form will look like when displayed. Changing the size of your browser window will also show how the appearance of the form will change based on screen size. It is a good idea to check the responsiveness of your form as many users may use their Smartphones or other devices to access the form.