Scheduling a webinar
You will want to provide the following information when scheduling your webinar.
- From the Zoom web portal when scheduling or editing a Zoom webinar, click the Webinar link on the left.
- Click the Schedule a Webinar button.
- Enter a Topic to identify the webinar.
- Schedule when the webinar will occur and set the duration.
- Click the blue Schedule button when done.
Recommended settings:
- unchecking the requirement for Registration
- checking Enable Practice Session
- unchecking Only authenticated users can join
Optional settings to consider:
- Webinar passcode
- Q&A – by default, attendees will see only answered questions
- Automatically record webinar
- Setting alternative hosts
Assigning panelists
- From the Zoom web portal when scheduling or editing a Zoom webinar, click the Webinar link on the left.
- Click the name of the webinar.
- At the bottom of the webinar settings, under Invitations, click Edit to the right of Invite Panelists.
- Enter the full name and email address of each panelist.
Editing the Q&A settings
- From the Zoom web portal when scheduling or editing a Zoom webinar, click the Webinar link on the left.
- Click the name of the webinar.
- At the bottom of the webinar settings, under Q&A, click Edit to the right of Settings.
- Select the desired Q&A settings:
- Allow anonymous questions
- Allow attendees to view answered questions
- Allow attendees to view all questions with the ability to upvote and/or comment
Setting up a Poll
Polling allows webinar hosts to easily poll attendees. It’s better to set up polls ahead of your webinar. Zoom provides helpful instructions on its Polling for webinars help page.
Creating a registration form
In the event you want to require attendees register for a webinar, you can create a Google Form based off of the Webinar Registration Form template. This template serves as a starting point for a registration form, so you’re welcome to add to or remove from it as you want.
- Go to the Google Drive folder or Shared drive where you want to save the registration form.
- Click the + New button in Google Drive and click the right arrow beside Google Forms. Click From a template.
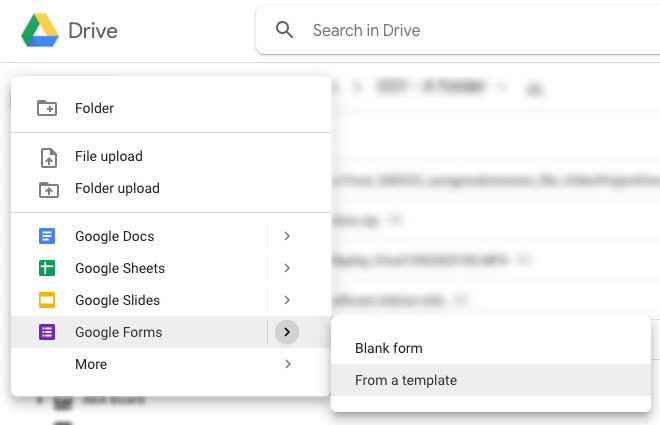
- From the Template gallery, click Webinar Registration Form.
- This form is set to collect email addresses by default. If the form is set to only collect Lafayette email addresses and you want it to allow for any email address, click the gear icon in the upper-right of the screen. Uncheck Restrict to users in Lafayette College and its trusted organizations and click Save.
- In Section 2, enter the joining instructions for your attendees, which should include a link to the webinar.
- Edit the rest of the form as needed. You might also want to customize the confirmation page by clicking the gear icon in the upper-right and selecting Presentation. Enter the customized text and click Save.