Use these strategies and tools to help you, as an instructor, confidently manage virtual office hours.
Virtual Office Hours
Holding online office hours is a great way to stay connected with your students. It also makes it much easier for students to reach out when they need help. There are a few different ways to run your online office hours. You can let students drop in whenever they want, set up scheduled appointment slots, host video calls, or use quick text chats.
Google Calendar
Google Calendar can be used to schedule one time as well as repeating blocks of office hours with web conferencing included.
- Go to calendar.google.com and sign in using your Lafayette email, then Lafayette credentials
- Add an Event on the day/time you wish to schedule the office hours
- If you would like the event to repeat, click “More options” at the bottom
- On the next page, click “Does not repeat” for a list of options for repeating events
- To add a custom stop date, choose “Custom…”
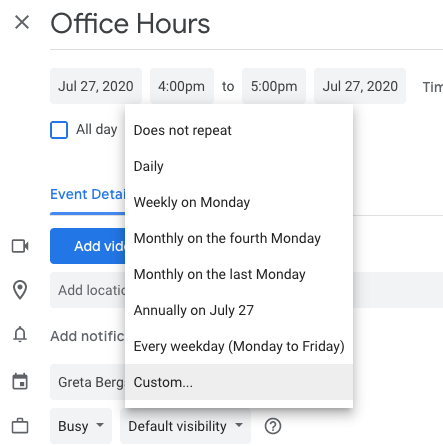
- To add conferencing, click [Add video conferencing] and choose either Google Meet or Zoom. This will automatically add a meeting URL to the calendar event
- To invite your students, add them individually in the “Guests” section or add the Google Group for your course (see Google Group for Courses for more details)
Zoom
Zoom is an effective tool for open or scheduled office hours as it allows you to use the Waiting Room feature to admit students one at at time. You may also use the chat feature in Zoom to message those in the Waiting Room with an update about when you will be available to talk to them.
Google Calendar Appointment Slots
You can use appointment slots to schedule one-on-one or group meetings with your students. Both Google Calendar and Moodle have built-in options to help you set these up.
Google Calendar has its own appointment feature that lets students sign up for a specific meeting time. You can share these time slots with a single class, multiple classes, or just a specific group of students who need to meet. Follow Google’s instructions for creating an appointment schedule.
Note: Each reserved time slot will have its own individual Google Meet link. If you would like a consistent meeting link or would like to use Zoom instead, you can add a single Google Meet link or Zoom link into the description field of the booking page. Instructions should be given to use that meeting link instead of the automatically generated Google Meet link.
Moodle Scheduler
The Moodle Scheduler tool lets you set up appointment slots inside your Moodle course. This allows only the students in that specific course to see and book them. If you want to meet online, you will need to paste your video call link into the description or the “Location” box.
The biggest advantage of using Moodle Scheduler instead of Google Calendar is reminders. Moodle lets you send automated reminders to students who have a meeting coming up. It can even send a nudge to students who haven’t picked a time slot yet.
- Select the “Edit Mode” toggle in the upper right to begin editing the course site.
- Choose the topic block to which you would like to add the Scheduler and click Add an activity or resource
- Select “Scheduler” from the Activity Chooser
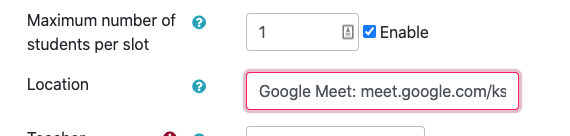
- Enter a title and choose initial settings such as the maximum number of students that can register (Options section), whether or not the activity is graded (Grade section), and if a booking form will be used to collect information or files from each registering student (Booking form and student-supplied data section)
- Click [Save and display]
- To add slots, click “Add slots” and choose to either add repeated slots or a single slot

- On the next screen, you will have the option to determine the duration of each slot, repetition of time slots until a specific date, and the ability to add a “Location”. You may want to add a Google Meet link or Zoom URL here for web conferencing (see the Scheduling Open Office Hours instructions above for information on how to generate a meeting link)
- Save
Once time slots have been generated, you may choose to send an invitation to students to sign up for a time slot or to send a reminder once students have reserved slots. You may also manually assign students to specific slots by clicking “Schedule” next to a student’s name.

Office Hour Chat
Instead of a video call, you can use text messaging to answer your students’ questions. You can do this during a set class time or leave the chat open for whenever people need it. Moodle Chat and Google Chat are the best tools to use for this.
Moodle Chat
Moodle Chat is a tool inside Moodle that lets you set up specific texting times with your students. You can schedule these chats as a one-time event or have them happen every week. The chat room is only open to students in that specific Moodle course, and you can save the conversation so people can read it later. Students can also join the chat using the Moodle mobile app on their phones.
- Select the “Edit Mode” toggle in the upper right to begin editing the course site.
- Choose the topic block to which you would like to add the Chat and click Add an activity or resource
- Select “Chat” from the Activity Chooser
- Add a title and optional description
- Other settings include the “Next chat time” for the start day/time and whether the chat time will be visible to the students, a single occurrence, or repeated on a specified basis in the “Chat sessions” section
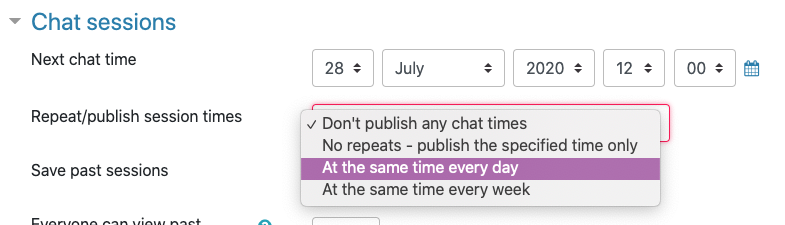
- You can also elect to save the messages from the chat and if the saved messages will be visible to students
- Click [Save and Display]
- To start the Chat, click “Click here to enter the chat now”. There is also an option for a more accessible interface for those using screen readers
Google Chat
Access Google Chat at chat.google.com, on the mobile app, or right inside your Lafayette Gmail. You can use it to send a direct message to anyone at Lafayette, or you can use “Spaces” to have group conversations. Google Chat works best for ongoing conversations rather than scheduled ones.
See our instructions for “Using Google Chat” for more information.