Zoom is Lafayette College’s preferred web conferencing platform. The following will provide you with the steps for getting started in Zoom.
Signing into the Zoom Desktop Client
Use your Lafayette credentials to log in to Zoom via SSO.
- Click “Sign in with SSO”
- Enter “Lafayette” as your domain
- Click Continue
- You will be redirect to Lafayette’s CAS authentication page to sign in
- After signing in, you will be redirected back to the Zoom Desktop Client
Upgrade/update to the latest version of Zoom
- Open the Zoom desktop client
- Click your profile picture in the upper right hand corner
- Click “Check for Updates”
- If there is a newer version, Zoom will download and install it
Testing your video before a meeting
- Log in to the Zoom desktop client
- Click your profile picture and select “Settings”
- Click the Video tab
- You will see a preview of your camera and can choose a different camera if needed
Testing your video during a meeting
- From the Zoom meeting window, click the arrow next to the video icon

- Select Video Settings
- Zoom will display your camera’s video and settings
- If you don’t see your camera’s video, click the drop-down menu and select another camera
Testing audio before joining a meeting
If you haven’t enabled the setting to automatically join by computer audio, you can test your speaker and microphone before joining a meeting.
- When joining a meeting, click Test speaker and microphone
- The meeting will display a pop-up window to test your speakers. If you don’t hear the ringtone, use the drop-down menu or click No to switch speakers until you hear the ringtone. Click Yes to continue to the microphone test
- If you don’t hear an audio replay, use the drop-down menu or click No to switch microphones until you hear the replay. Click Yes when you hear the replay.
- Click Join with Computer Audio
Testing your audio while in a meeting
You can access your audio settings and test your audio when you are already in a meeting.
- In the Zoom meeting window, click the arrow next to the microphone icon
- Click Audio Options. This will open your audio settings and you can use the instructions from “Testing audio before joining a meeting” above
Scheduling a Meeting from Zoom
- Using your Lafayette credentials, visit My Lafayette under “Connect to my accounts,” or visit https://zoom.lafayette.edu, or open the Zoom application from your device
- Sign in with your Lafayette credentials
- Select “Schedule a New Meeting” from the upper right-hand corner
- Choose the appropriate options for date and time, etc.
- Security features can be enabled such as requiring a password or a waiting room
- Click Save
- From the next page, choose the “Copy the Invitation” link and paste it into an email to be sent to all meeting participants
Scheduling a Meeting from Google Calendar
- In Google Calendar, click on the day/time to create a new event
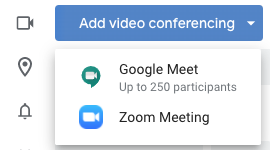
- Click “Add video conferencing” to add Zoom video conferencing

- In the “Add guests” field, type in the name of your invitees
- Click [Save], you will be given the option to send invitation emails to invited guests
All guests will now have the meeting on their Google Calendar with a Zoom link attached.
Additional Options
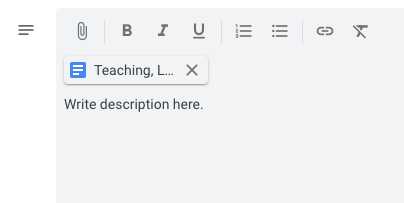
Some additional options include adding a description to the event in the “Add description” field or attaching files (Google Drive files or uploaded files) to the calendar event available to all guests.

Starting a Meeting from Zoom
- Using your Lafayette credentials, visit My Lafayette under “Connect to my accounts,” visit https://zoom.lafayette.edu, or use the Zoom application on your computer/tablet/smart phone
- Select “My Meetings” to see a list of all of your scheduled meetings
- Click the [Start] button for the appropriate meeting
- This will prompt the Zoom application to be opened on your computer
- Choose the appropriate audio and video sources from the lower left-hand corner of meeting window
If you are concerned with un-invited people joining your Zoom meeting, see How to secure a Zoom session.
Starting a Meeting from Google Calendar
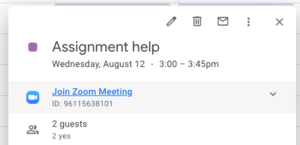
- Click on the event in Google Calendar to see the event details
- Click “Join Zoom Meeting”

- You will be redirect to a Zoom landing page and will be prompted to Open zoom.us to launch the Zoom desktop client
- You will be taken into the Zoom meeting
Joining a Meeting from Zoom Invite
- Use one of the options listed in the email invitation (e.g., link or phone number)
- If joining from a computer, you will be prompted to download the Zoom application
- Note: you do not need to create a Zoom account to join a meeting, just the Meeting ID (and password if applicable) found in your email
- Open the Zoom application and choose [Join]
- You may be prompted for the Meeting ID which can be found in the email invitation
Joining a Zoom Meeting from Google Calendar
- Click on the event in Google Calendar to see the event details
- Click “Join Zoom Meeting”

- You will be redirect to a Zoom landing page and will be prompted to Open zoom.us to launch the Zoom desktop client
- You will be taken into the Zoom meeting
Providing nonverbal feedback during meetings (participants)
To provide nonverbal feedback to the host during a meeting:
- Join the Zoom meeting as a participant
- Click the Reaction button
- Choose from the following icons or click
 to choose from a full set of emojis. Click the icon again to remove it. Click the icon again to remove it.
- The selected icon will appear in your video panel and next to your name in the participants list.
Managing nonverbal feedback (hosts)
Click the Participants button to see a list of participants and their nonverbal feedback. In the participants list, you can view and manage feedback using these features:
- If a participant clicked on a feedback icon, you will see that icon beside their name.
- The number above each feedback icon shows how many participants have clicked on that icon.
- If a participant clicked raise hand, you can lower their hand by hovering over their name and clicking Lower Hand.
- Click Clear All to remove all nonverbal feedback icons.
Accessing in-meeting chat (desktop)
While in a meeting:
- Click Chat in the Zoom meeting controls
- The Chat box will open on the right-hand side of the screen. You can type a message into the chat box or click on the drop-down next to “To:” to send a message to a specific person.
- When new chat messages are sent to you or everyone, a preview of the message will appear and Chat will flash orange in your host controls.
When screen sharing:
- Click More in the Zoom meeting controls. Choose Chat
- A floating chat window will appear
- If you receive a new chat messages while screen sharing, the More button will flash orange to indicate the incoming message. You can click on More, then Chat to open the chat box.


